Wednesday, December 2, 2009

Other Stuff

So due to the fact that I haven't started building the BBQ/kitchen, the updates have been pretty slow. So I've expanded this to cover things I have been doing!

Latest project was "reclaiming the garage". Plan was to get the crap out, build a movie/game room, and have room for bikes, skateboards and even, shock of all shocks, a car!

Critical component is a driving game setup, so I ordered one of these.....

It should be delivered tomorrow..... Guess I know what I am doing this weekend. I'll add some more pictures/details form the garage project later.

Thursday, July 23, 2009

Updated Final Final Final Plan

Got some more feedback, and after doinking around for a while have come up with the following "final" plan. Decided to get the fridge outside of the "U" as there is only room for one person in there.

I put the kegerator in there since that is only accessed to change the beer every few weeks. I should still be able to run the tap to the same location with a short length of insulated tubing under the granite. I turned the tap 90 degrees so people can pour a beer without needing to go inside the "U".

This shows the view from the bar counter side. These are the exact stools we have (gotta love google) - the height is good.

View from the other end. The fridge should look good out there. I am a little worried that the door (glass) will get broken by a baseball, but we'll deal with that when it happens......

Aerial view.

I shortened the deep counter by a couple inches. Overall this is a much more usable plan, and fits in well on the deck, still leaving plenty of room for the table and chairs.

Wednesday, July 8, 2009

Final Plan

I have finalized my plan after much late night tweaking of details. I have gone back to the 42" grill instead of the 54". Primarily due to lack of counter space if I get the 54, but the $1,300 price difference had something to do with it also.

The components in the drawings are not exact (these are Kitchenaid models that were available online in the sketchup library), but they are approximately the same size.

There will be double doors under the grill for storing junk like the grill cover and other things that spiders can turn into homes. Below the double side burners will be utility drawers which are for BBQ tools etc - hopefully they are more spdier resistant. By dropping down to the 42" grill there is plenty of counter space on either side of the grill.


This shot shows the counter area - It ends up as 8' wide, which should comfortably seat 4, even if two of them are my kids. I currently have 3 aluminum counter height chairs, so I need to find another one of those from wherever it was that I bought it many years ago. No doubt is it discontinued and it will cost me a small fortune to find one that matches.

And this final picture provided some of the inspiration. It's from the Lynx grill catalog, which are the components I am using. I'll go with a darker granite than they did, but this is the basic look I am shooting for. That is teh exact grill and double doors. the drawers on the left will go below the burner. The burner I am using is different from the one they show.

The good news is that I got close in Sketchup. Now the big question is whether I can get close in the real world!

Plan B++

Did a few more late night tweaks to the edges and corners to really think through how the granite and tile come together in all the tricky spots!

This is the stuff that will make the real thing look either great if I get it right, or crappy if I get it wrong. And it's much easier and cheaper to change it in Google Sketchup vs having granite recut (especially if they need to make it bigger).

This one shows the new granite corners alongside the stone tile. I have been using my dad as an artistic/architectural advisor, which has the benefit of being much cheaper than using someone who knows what he is talking about.

I'm pretty happy with this layout, and tonight I'll add in the grill and other components to see how it looks when it's stacked with shiny stainless steel.

Tuesday, July 7, 2009

Plan B+

Here's some updated plans for the kitchen. This one will fit perfectly on the deck, and the granite is now on and I worked out some of the tricky corners/edges, and centered things appropriately. I also deciced to go big (ie. 54") with the grill - That way I can get the one with the built in searing unit and still have enough regular grill space. Sure it costs more, but who's counting (not me, and hopefully not Liz either....) - It's going to be a little over the top but I think it is starting to look pretty cool.

Tomorrow I will add the tile, add in grill etc, and then put in some under counter lights and teh arbour/pergola.


Hot Tub & Fridge Door

Realized I hadn't posted any pictures of the hot tub. It is in and working. I had to cut down some fence but that was all painless enough. It is a big tub, with room for the whole family and then some. It claims to seat 6-7 adults, but they would have to be close friends for that to be true - Now I am all for it if I get to choose the other 5-6 people who are in it with me.

I also got the white door trim on the fridge painted. It came out pretty good. You can tell it is not real stainless, especially as it is right next to real stainless, but it looks good enough. Once it is built in you will not notice. I still need to paint the hinge bracket piece on the bottom right. I did the door and the grill beneath the door, but missed that bit.

I also marked up the Plan B dimensions on the deck, which you can just see in this picture. With a few tweaks it is going to fit perfectly. I am going to make the adjustments, get management approval from the wife when she is back on Wednesday and then place the order. Then things start to get real and I will have a garage/yard full of kitchen parts unless I get my act together.

Sunday, July 5, 2009

Plan B

After looking around at some more BBQ designs I am looking at something a little more interesting. Not going completely crazy and throwing in hard stuff like curves and the like, but this one should be a bit more fun.

Instead of just an "L" I have made it a "U". There's still the seating area (at the bottom of the "U", but it's now counter height VS bar height (which will match the chairs we have much better). It's 8' wide, so there is room for 4 people sitting there.

I added a split bar section on the new section of the "U" which will be the place to lean on whilst enjoying a pint of Belgium's finest beer - I also extended the top of the "U" with a small bar section just to balance things out. The beer keg will be in the short "U" side, and the beverage fridge going in the bottom of the "U"

I need to chalk it out on the stone deck to check it's not too big and that we'll still have plenty of space between the bar and the dining table.

Assuming it fits I am going to go ahead and order the BBQ island framing kits this week. then the fun begins!


Friday, June 19, 2009

Monday, June 15, 2009

Progress - and Mistake #1

Progress has been made! The bluestone decks have been extended to make room for the BBQ island and the hot tub. The contractor did a good job and other than the grout color (which should fade over time) you can't really tell where the old deck ends and the new deck starts. I am very glad I didn't do this myself. He was quick - took less than 5 days from start to finish.

The new deck meant adjusting the landscaping a little - resetting some sprinklers (which I did) and also raising the lawn to the deck height as previously the lawn was on a slope. I had the landscapers do this, who are also going to do our ongoing yard maintenence as the previous guys seemed to have lost interest in keeping our plants and trees alive. We also had them do some other tidy up and reseed the lawn where it had died due to some crazy animal attack a few months back. So teh backyard is looking pretty good right now - just in time for summer!

Now, onto mistake #1 - I realized it when I opened up the appliances. I managed to order a fridge that had white trim around the glass in the door. It was impossible to tell the difference between white/stainless steel in the pictures and it was only mentioned in the small print. Seems pretty stupid that they would make a fridge with a full stainless steel exterior except for the door trim. I guess this is the downside of ordering on the web instead of going to a store and looking at something for real. Unfortunately they do not make a stainless framed glass door unit so I figured I was stuck with it, or would have to return it go with a solid stainless door. But then I found Thomas' Liquid Stainless Steel which is apparently the answer to all my problems. We'll see what $20 and a couple hours can do when it turns up later this week.

This is the hot tub area. That has been not so much mistake #2, but certainly a challenge. Given that hot tubs are large, heavy and don't bend, you need to be able to wheel them into place. Now we don't quite have the room due to a low hanging roofline on the corner of our house. Our options were...
  1. smaller hot tub
  2. go through the neighbors yard and take down some of the fence
  3. take down our gate/fence and move some plants
  4. crane it in over the house
Decided on option number 3 even though I really wanted to go with the crane as that would be cool (and expensive). Need to do the demolition work before Friday when the tub is delivered. We'll see how that goes....

Monday, June 8, 2009

Appliances - Phase 1

In order to make sure the holes in the island are the same size as (or at the very least, not smaller than) the appliances that go in them, it is recommended that you buy the appliances before you build the island. Alternatively you can rely on the manufacturing specifications and hope....

Being that I now have a nice new, empty deck area, and already have a freestanding BBQ grill I went ahead and ordered the fridge and beer kegerator. They are both standalone units, so I can use them in advance of building the kitchen anyway.

Went middle of the road, with summit appliances. Not super high end, like Marvel, but not the cheapy stuff like Danby. Full stainless (even though they look white in these pictures), and fully outdoor rated/weatherproof and OK to be built-in. They get good reviews, so will hopefully look OK, not fall to pieces too soon, and most importantly, keep things cold when it is hot and sunny.

These should get delivered this Friday, the 12th, so I will hook them up to the exitsing nearby GFCI outlet, but need to get a new circuit run to the BBQ area. I will probably have the electrician who hooks up the spa do that while he is in the main panel.

Most importantly I need to now get a move on and order my first keg of beer. Nothing like that first draft beer in the backyard to signify the start of summer!

Still doing the research on the grill. If I decide to go high end, it will likely be a 42" Lynx grill. They seem to be the best of the top tier grills, but I am struggling to justify the ridiculous price for a BBQ. However, I cannot find any lower priced grills that look good, are built well and also cook properly. So I am trying to justify it by thinking of this as a kitchen that just happens to be outside instead of a BBQ that I will occasionally burn food with.

Once I pick that, I'll be good to go as the rest of teh stuff falls into place pretty easily by getting the matching side burner, and stainless steel access doors.

Then I can finalise my plan and order the steel framing kit from bbqcoach.com and get this show on the road!

Of course, once I have the hot tub working and the draft beer flowing freely in the backyard there is no telling how quickly anything will actually get built.

Progress

The work to extend the bluestone decking has been done (pictures to follow). This definitely fell into the "screw it up and waste a lot of money" category so professionals were used. We extended in two areas:
  • for the BBQ kitchen
  • for the hot tub
Figured it would be easier/cheaper to get these done at the same time. Now I need to tidy up the landscaping, raise the grass level (the grass was sloping, the deck is level, so now the grass is about 3" below the deck where they meet) and adjust the sprinklers a little so that more of the lawn and less of the deck is being watered.

Hot tub has been ordered, and should be delivered next Friday 19th. Went with a pretty big unit from Hot Springs Spas - the Grandee - it seats 6-7 people, has 50 something different jets, a waterfall and massage thingies. More technology in it that the space shuttle.

This is the same outside color we chose, but our inside is a dark granite color. Need to find an electrician to hook it up, which falls into the "screw it up and die" category, so a professional will be used.

Thursday, June 4, 2009

The Plan

This is the first plan.  Not final, but it is the rough layout I will be doing.  

It will be steel studs, hardiboard and then some suitable finish.  Not sure if it'll be strucco or stone/tile.  Countertop will probably be granite.

Haven't chosen all the compoents yet.

Drawing was done in google sketch with a lot of help from a friend who has used it lots.  It is a pretty good tool for quick mockups of stuff like this - far easier than AutoCAD and other "real" CAD programs.

And that brings us up to date

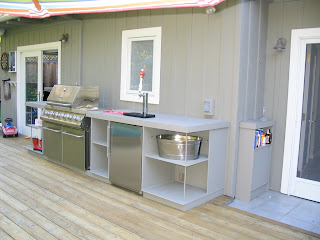
This is the new backyard.  The island will go to the left of the BBQ cart in this picture.  I am having the bluestone deck extended (professionally, not gonna do that myself) and will then build an L shaped island with a large grill, side burners, fridge and kegerator.  One side of the L will be a split bar with room for 3-4 barstools.

Eventually I'll put a trellis over the top with lights, speakers and maybe a heatlamp.

My Second Outdoor Kitchen

So this was attempt #2.  Moved in the summer, wanted to BBQ and drink beer so bought a freestanding BBQ/cart (cheap Kenmore) and a budget beer keg fridge.


Then I decided to build around it after a month or so to create a pseudo kitchen.  Since it wasn't supporting anything and wouldn't be right against the grill I went with wood.


Once it was done I painted it up and dragged my butt about the countertop.  


Eventually, just before the rains came I tiled it.  Bought a tilesaw and did it all myself.  after a long weekend of work I was done.  It rained that night and it never really recovered.  After several bodged attempts at fixing it I called it quits and called in a professional.


He did a much better job.

My First Outdoor Kitchen

So this was my first attempt.  Went big on appliances (DCS 48" grill, marvel beer fridge etc.) and decided to go with cement block for the island.

Building that was pretty easy, kinda like legos. Had a professional pour the slab and had the builders run the gas to the area.  Did everything else myslef, with help from equally inept friends and family.

For the countertop I went with concrete.  But not poured in place, instead poured into forms, and then installed like granite.  This was a lot of fun but a ton of work.  I wouldn't do it again.

One bad stucco job later it is just about done.  We ended up moving before I got a chance to set the stone tiles, so they were just placed there and you had to walk carefully so they didn't crack.

Monday, June 1, 2009

First Post

Here is a new blog, to document my journey as I build an outdoor kitchen. I've built a couple before, and phrases I would hear from visitors were along these lines....
  • "cool - it will be really nice when it's finished"
  • "wow - I've never seen anyone use that material in that way before"
  • "wow - I'm surprised you could do that and still be within code"
  • "interesting, how did you make something so flimsy looking strong enough?"
  • "wow - I never thought you could use wood so close to the grill"
Fortunately we moved from those homes. The plan with this one is to "do it properly" as we don't intend to move anytime soon. Unfortunatley, that phrase and the fact that I am doing as much of the work as possible, are somewhat at odds, so have agreed the following basic principle: I am going to do as much as I can myself, but have promised to bring in professional help in any of the following situations
  • I have zero idea what I am doing and will likely make it look very ugly
  • I have zero idea what I am doing and will likely waste an awful lot of money if I screw it up
  • I have zero idea what I am doing and will likely blow up the house or kill somebody
So far I have a basic plan/location determined, rough idea how to build it (steel frame) and some idea of the types of components (most important of which is the beer fridge).

In the next post I'll put up some pictures of the last 2 efforts, and then get some before pictures up for this one.